/
How do I enable services on my website?
How do I enable services on my website?
Whether you have one location or many, the Command Center Service Manager allows you to easily enter and display the services your business offers. You can add and remove pre-loaded services, create custom services, and apply pricing and availability for each service based on one or more store locations.
Enabling Service Manager
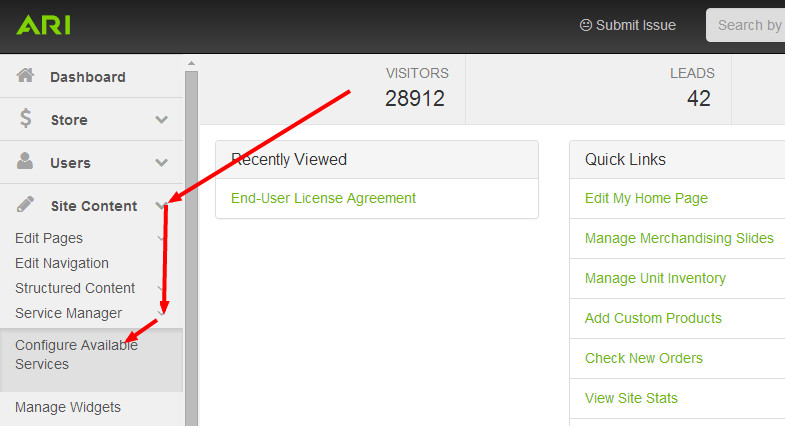
Start from the Command Center Dashboard (a.k.a. Home page). Click on and expand the Site Management section, then click Service Manager > Configure Available Services.
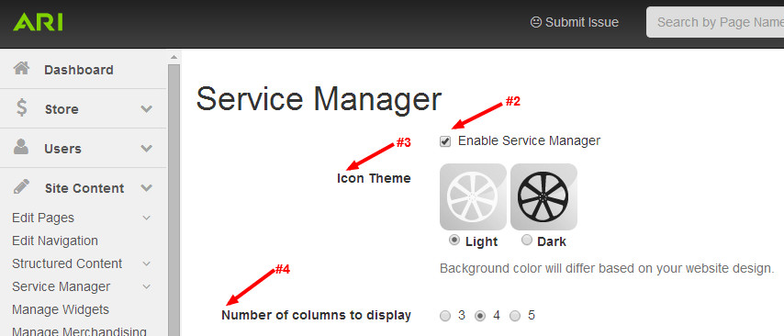
- At the top of the Service Manager page, you should see a check box selection titled Enable Service Manager. Check the box to enable.
- You may optionally choose an Icon Theme for pre-loaded services. The choices are Dark or Light. Websites with a dark content area typically look better with a Light theme and vice versa, but that is not a hard rule. Use your own discretion to determine what looks best. You can easily change your theme at any time.
- The next setting allows you to choose whether the service icons on your main service page display in 3, 4, or 5 columns. Choose the setting that best suits you.
- If you deactivate the Service Manager, we advise that you check your website’s navigation bar and remove (or change) any links to your main Services page (www.yourdomain.com/service-list.htm).
- If you wish to allow customers to submit service appointment requests for any of your services, please see the article entitled How do I configure my Request Service form?
Related Articles
, multiple selections available,
Related content
Enable Services for Display on Website
Enable Services for Display on Website
More like this
How do I add pre-loaded services to my website?
How do I add pre-loaded services to my website?
More like this
How do I add a custom service to my website?
How do I add a custom service to my website?
More like this
How do I manage my services for multiple store locations?
How do I manage my services for multiple store locations?
More like this
How do I remove a service from my website?
How do I remove a service from my website?
More like this
Managing Services for Multiple Store Locations
Managing Services for Multiple Store Locations
More like this

