Global CSS Setup
- Former user (Deleted)
- Damon Kleckler
Analytics
This is the procedure for setting up a client with the Global CSS file. This same file effects all the sites on the Dealer Spike Marketing Platform. Follow the steps below to ensure that your client gets all the benefits.
Setting up a Client
In order to get these CSS changes to happen sitewide, we are going to add a new CSS rules to the website. This will be done by simply adding the a line of code to the stdHeaderStart file. This will import all the global css changes from the files from our part of the server.
Adding the Code to the CSS File
When a SEO Rep receives a new client, you want to make sure that you add the Global CSS file to their less folder to get all the styling to take effect. These Global CSS changes are considered the base, so if changes need to be made on-site, like in the editor, it will override the Global CSS.
You want to first go to their folder in Notepad++, Atom, or any HTML editor with FTP protocols. Proceed to your client’s folder, as seen in Image [1] to the right. [FOR THIS TUTORIAL: WE WILL USE PARIS HARLEY - parisharley.com]
Once, you are in your client’s folder, you need to go to the “includes” folder as seen in Image [2] to the right. You are going to want to enter this folder to see the different files.
You will see the file labeled as “stdHeaderStart.inc”. This is the Standard Header Start file for the client’s website. Most of their CSS includes are in this file. Since this isn’t less file, it will not be needed to be compiled after being changed in the admin panel. For right now, open the “stdHeaderStart.inc” file seen in Image [3] below. You should see the start of a HTML document with some standard editor code and scripts inside like in the Image [4] to the right.
Below the line with code,
<link id="responsiveStyles" rel="stylesheet" type="text/css" href="/styles/styles.css" />
just paste the following into the “stdHeaderStart.inc” file.
<!-- SEO CSS Import File - [SEO Rep Name] - [Enter Date Added] -->
<link id="seoStyles" rel="stylesheet" type="text/css" href="/imglib/seo/css/seo-css-v6.css" />
Fill in the [SEO Rep Name] and [Enter Date Added] with your SEO Rep’s Name and Enter the Date added. This will make sure that support and anyone else that reads this file will not mess with our line of code without checking with the SEO Rep first.
Save the file and you have the completed the process. You should see the file in the "view source" if you inspect it.
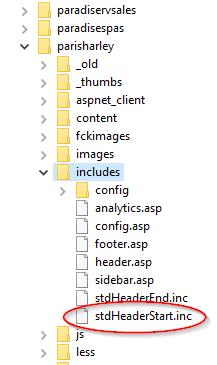
Image 3

Image 1

Image 2

Image 4