When adding a form that includes fields for capturing sensitive customer data, it is vitally important that you DO NOT use the Lead Component. You should only ever use the Secure Lead Form Component in these situations. The Secure Lead Form Component provides added security on the website by rendering a form on a secure (HTTPS) page.
Secure forms can either come from a pre-built library or they can be custom forms creating by our ARI Web Development team. The only condition is that the website account must have the Secure Lead Form Component. If an active or inactive instance of the Secure Lead Form Component is not present in your website account, you may submit a request to Updates@arinet.com to have this component added.
Adding the Secure Lead Form Component
Activating the Secure Lead Form Component
When an instance of the Secure Lead Form Component is not already enabled on the website, do the following to turn the component on.
- In the ARI CMS, go Account > Components. Click on the Inactive Components tab.
- Navigate to the Secure Lead Form Component and slide the On/Off toggle (next to the trash can icon) to the On position.
- Go to the Active Components tab. Scroll down to the component in the list and click on the gear icon to proceed to configure the form settings.
Adding a New Instance of an Active Component
If an instance of the component is already enabled on the website, do the following to create a new instance of the component.
- Go the Account > Components. Remain on the Active Components tab.
- Navigate to the Secure Lead Form Component. Below the title, click the link labeled, “Add Another”. A new instance of the component will be created and listed underneath the original component.
- Click on the gear icon to proceed to configure your form.
Configuring a Secure Form
PLEASE NOTE: Only Dealer Administrators can configure
password protection for secure
forms. Please see Secure Forms: Password Protecting "Customer Sensitive" Form Fields
- In
- the ARI CMS, go
- to Account. Find the applicable website in the Sites list and
- select Components.
- Scroll down to the instance of
- the Secure Lead Form Component
- that you wish to configure. Click on the gear icon.
- Apply
- a Page Rule, to specify on which page (or pages) the form will display.
- Apply
- a Section Rule
- of Main Content, unless the form is intended to reside in another section. If that is the case, choose the section where the form should display.
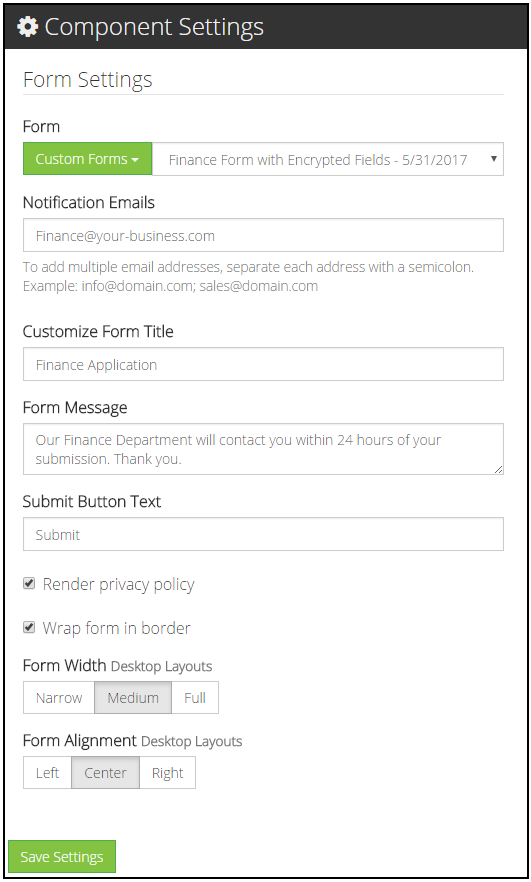
- Under Component Settings, users have the ability to configure the following items:
- Form: The user selects the form that will display on a secure page on storefront.
- Default Forms: To select a system form, ensure that the green button below the “Form” label
- Form: The user selects the form that will display on a secure page on storefront.
- says Default Forms. Then click into the form field to select from one of the available options.
- Custom Forms: To select a custom form, ensure that the green button below the “Form” label
- says Custom Forms. Then click into the form field to select from one of the available options.
- Customize Form Title: This adds a custom title at the top of your form on storefront.
- Form Message: This adds a custom message to the top of your form on storefront.
- Submit Button Text: This field replaces the form button text of “Submit” with a custom value (Example: “Apply Now”, “Go”, etc.)
- Render privacy policy (Checkbox):
- When selected, a link to the website privacy policy page is added to the form.
- Wrap form in border (Checkbox):
- When selected, the form is wrapped in a border on storefront.
- Form Width:
- This menu gives users three pre-set options for determining how wide the form should display on the secure web page. Options are Narrow, Medium and Full.
- Form Alignment:
- This menu gives users three pre-set options for determining how the form is aligned on the secure web page. Options are Left, Center, and Right.
- Global Lead Forms Settings: These options are applied to ALL of the forms on your website. Changing them in one component will update them in all other form components.
- Send automatic email reply to customer: When enabled, an auto-reply email is sent to the user who submits the form (provided that they have entered their email address into the form).
- Show "Receive Offers" checkbox: This adds a “Receive Offers” opt-in checkbox to all site forms. On storefront, when Receive Offers displays it is unchecked by default. This feature cannot be configured to function as an “opt-out” (ie. making the checkbox checked by default).
- Click Save
- Settings and Publish Changes.
Secure Lead Component - ARI Internal View
Secure Forms:
Password
Protecting "Customer Sensitive" Form Fields
IMPORTANT:
If a form has custom fields (ie any field that is not part of an equivalent system form) to capture sensitive customer information (SSN, Driver’s License ID, etc.), these fields WILL NOT be viewable in corresponding lead records in the ARI CMS unless and until someone in the role
of Dealer Administrator
configures a password in
the Secure Lead Form Component
settings. This requirement is in place to protect dealers and consumers from security breeches.
Without a password being applied, non-custom form fields in the lead record will display to users, but custom fields will be hidden. Additionally, custom fields are permanently inaccessible on lead records captured prior to a password being configured
for the form. In short, it’s very important to add a password as close to the deployment of the form as possible, so that captured customer information isn’t irretrievably lost.
It
is not possible
for an ARI employee to configure the password settings on a secure form. For security purposes, only users in the role
of Dealer Administrator
can manage the password settings for the component.
Activating Password Access on Customer Sensitive Fields
- In
- the ARI CMS, go
- to Account. Find the applicable website in the Sites list and
- select Components.
- Scroll down to the instance of
- the Secure Lead Form Component
- that you wish to configure. Click on the gear icon.
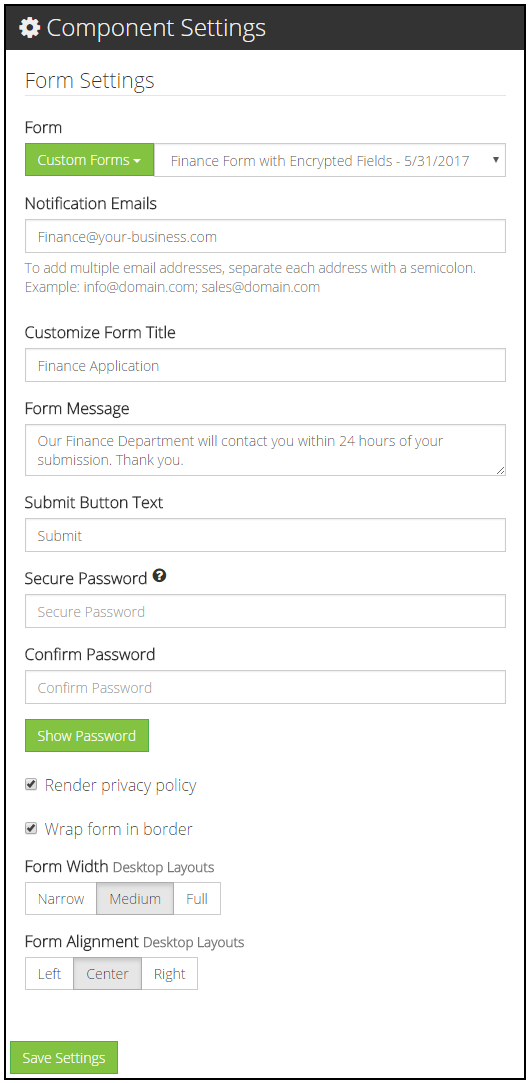
- Under Component Settings, scroll to the following form fields:
- Secure Password: Enter a password (minimum of 6 characters)
- Confirm Password: Re-enter the password
- Show Password: This merely decrypts the password in the browser view, so that a user can visually verify that they have entered the password as intended.
- Under Component Settings, scroll to the following form fields:
- Click Save
- Settings and Publish Changes.
Change Password - Secure Lead Form Component
If a Dealer Administrator wishes to change the password on the Secure Lead Form Component, they must know the current password. To change the password when the current password has been forgotten, please see Secure Leads: Forgotten Password.
- In
- the ARI CMS, go
- to Account. Find the applicable website in the Sites list and
- select Components.
- Scroll down to the instance of
- the Secure Lead Form Component
- that you wish to configure. Click on the gear icon.
- Under Component Settings, scroll
- to Password Set.
- Click
- the Change Password
- button.
- Enter the existing password in the field
- labeled Current Password
- In
- the Secure Password
- field, enter a password (minimum of 6 characters)
- Re-enter the password in
- the Confirm Password
- field
- Click Save
- Settings and Publish Changes.
Forgot Password - Secure Lead Form Component
If a Dealer Administrator has forgotten their password on
the Secure Lead Form Component, they can create a new one. No other dealer role or ARI role has access to the “Forgot Password” function.
IMPORTANT:
When a password is changed via
the Forgot Password
process, all previously captured custom fields for that form are permanently purged from the lead records. This is a security measure that cannot be bypassed by design.
- In
- the ARI CMS, go
- to Account. Find the applicable website in the Sites list and
- select Components.
- Scroll down to the instance of
- the Secure Lead Form Component
- that you wish to configure. Click on the gear icon.
- Under Component Settings, scroll
- to Password Set.
- Click
- the Forgot Password
- button. This generates a link and sends it to the email account for
- the Dealer Administrator.
- Clicking the emailed link will bring the user to a screen where they can enter and confirm a new password.
- In
- the Secure Password
- field, enter a password (minimum of 6 characters)
- Re-enter the password in
- the Confirm Password
- field
- Click Save Settings.
Secure Lead Component - Dealer Administrator View
Accessing Password Protected Lead Records
If someone in the user role
of Dealer Administrator
has set a password on
the Secure Lead Form Component, then any form submissions that are captured in the ARI CMS system can only be accessed when that password is entered in the lead record.
It’s important to note that not all form data is encrypted on password-protected forms. Basic information, like the customer’s name, telephone, and email address, will display in lead records without inputting a password. But any custom fields in the lead record, including fields meant to capture “customer-sensitive” information, WILL NOT display UNLESS the password for the form is entered.
- In
- the ARI
- CMS navigation menu, go
- to Leads
- > Leads
- Find the password-protected lead record that you wish to access and select “View”. You may use the refinement filters at the top of the page to help find the correct record.
- On
- the Lead Detail
- page, you should see a
- blue Decrypt
- button on the upper right side of the page.
- Click Decrypt.
- A Decryption Password
- modal window will open. Enter the form password and
- click Submit.
- If the password entered is correct, you’ll be returned to lead detail page and the previously encrypted form fields will now display.
NOTE: In order to access encrypted form data, the form password must be entered each time you open the lead record. If you have more than one password-protected lead record to view, you will have to re-enter the password for each individual record.