How do I create an installation package?
You can create installation packages that appear as options when a customer add tires or wheels to a cart or quote. Thus, they can request the installation of their tires/wheels, as wheel as other services you may offer.
Step-by-Step Guide
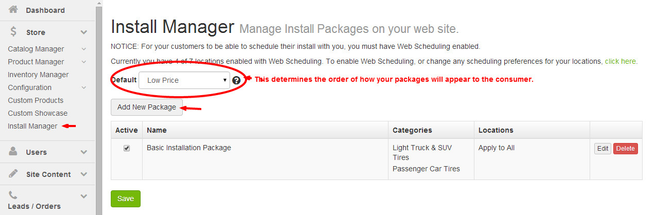
- In the Command Center left navigation, click Store > Install Manager.
- To add a new installation package, click Add New Package. If you wish to edit an existing package, click the Edit button for that package.
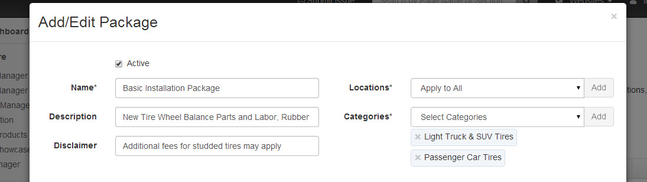
3. Once you have clicked Add New Package, you will now be prompted with an Add/Edit Package pop-up.In the top fields add the following:
- Name (i.e. "Basic Installation Package") - required
- Locations (i.e. "Apply to All") - required
- Description (i.e. "New Tire/Wheel Balance Parts and Labor, Rubber Valve Stem, Scrap Recycling Charge")
- Disclaimer (i.e. "Additional fees for studded tires may apply")
- Categories (i.e. "Light Truck & SUV; Passenger Car Tires") - required
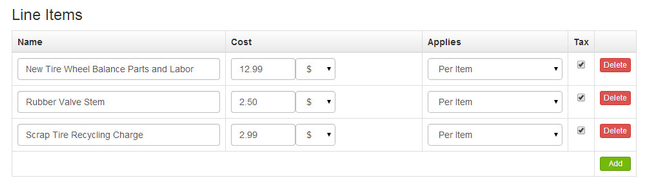
4. Line Items identify the specifics of the new package you are creating. Clicking the Add button allows for itemized line items. You will need to enter the following:
- Name - This is what customers will see when they are in the checkout process. This field is required.
- Cost - This is the amount that the line item contributes to the subtotal (can be either a $ amount or a % of the product price).
- Applies - This can be set to “Per Item,” meaning that cost is applied per tire, or it can be set to “Per Quote,” meaning that line item does not depend on the number of tires purchased.
- Tax - This check box is used to determine whether state and local tax should be applied to that line item.
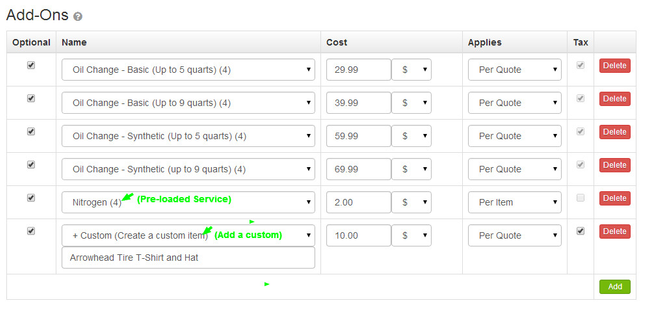
5. Add-Ons are similar to Line Items, except that you can set them up as optional line items for an installation package. Clicking the Add button allows for itemized Add-On items. You will need to enter the following:
- The Optional check box determines whether an add-on is optional or required. By default, any add-on you create will be “Optional.” If you wish for it to be a required part of the package, remove the check mark from this box.
- The Name field is what will display to customers for that add-on. It can be defined as either a "pre-loaded" service or you can create a custom item.
The Cost is the amount that add-on contributes to the subtotal
Applies can be set to “Per Item,” meaning that cost is applied per tire, or it can be set to “Per Quote,” meaning that line item does not depend on the number of tires purchased.
The Tax check box is used to determine whether state and local tax can be applied to that line item.
Add-ons can be deleted by clicking the red Delete button on the right.
6. Remember to Save.
Other Considerations:
If you have more than one package set up for a single type of tire, you may use the Default dropdown list to choose which package to select by default for the customer. (They will be able to choose what they want, this just sets the initial choice for them.)
- High Price selects the most expensive package.
- Low Price selects the least expensive package.
- No Default Selection leaves all packages unselected.
Taxes: To adjust your tax rates, you will need to go into Store > Store Configuration > Regional & City Taxes.
Related Articles