CDK Lightspeed PG&A Inventory Integration
Important
Please note: You must have a paid subscription to integrate your CDK Lightspeed NXT or EVO system with your ARI website. Please contact us if you wish to purchase this feature.
ARI and CDK offer dealers the ability to integrate their Lightspeed NXT or EVO dealer management system with their ARI Command Center. Part of this integrated functionality allows dealers to display part, garment and accessory inventory levels on your website, as well as update product pricing with the prices they have set within their Lightspeed DMS. A nightly synchronization between the two systems will occur, allowing the Command Center to import pricing and inventory levels from the Lightspeed interface. The synchronization will occur with products that exist within Lightspeed and are active in the Command Center.
In order to properly integrate, dealers must have:
- An ARI website with integration enabled
- Lightspeed NXT version 3.9.5 or later, or
- Lightspeed EVO 5.7 or later
Important
Please note: The following article assumes you have successfully completed the integration setup process and have confirmed data is flowing from your CDK Lightspeed system to your ARI website. Adjusting the configuration described below will not be sufficient to enable this functionality if you have not completed the integration setup process.
Step-by-Step guide
Once you have completed the integration setup, you will then be able to configure the Command Center to retrieve inventory levels and pricing from Lightspeed.
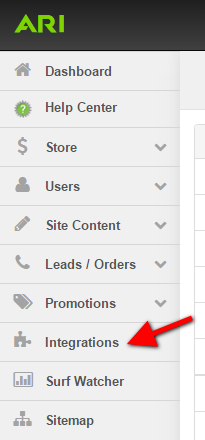
- From the Command Center home page, click on Integrations in the navigation bar on the left side of your screen.
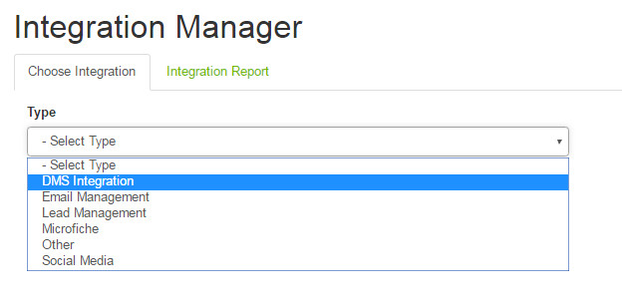
- From the Type drop-down menu, select DMS Integration.
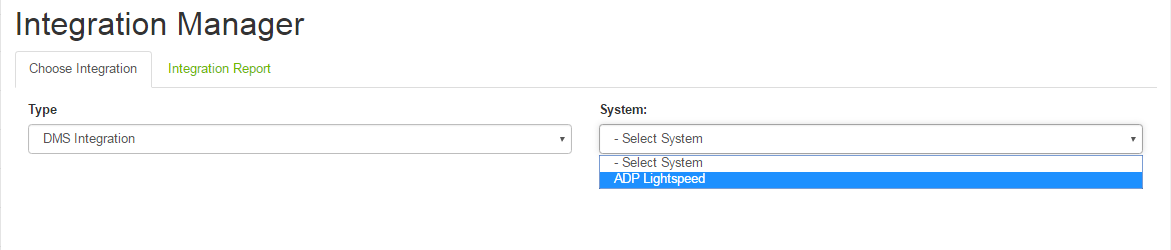
- From the System drop-down menu, select ADP Lightspeed (if you have NXT) or ADP EVO (if you have EVO). If neither of these options are available to you, please contact your ARI website consultant or sales representative.
- If the Product Owner Mapping button is displayed in RED text on this page, click the button to confirm that you have mapped DMS Supplier Codes from your Lightspeed system to available Catalog Owners on your website. You are allowed to map multiple DMS Supplier Codes to a single catalog owner, but you cannot map multiple Catalog Owners to a single DMS Supplier Code. Once you have verified these settings are correct, click the Map Supplier Codes with Product Owners button at the bottom of the list to Save your changes or Close to disregard.
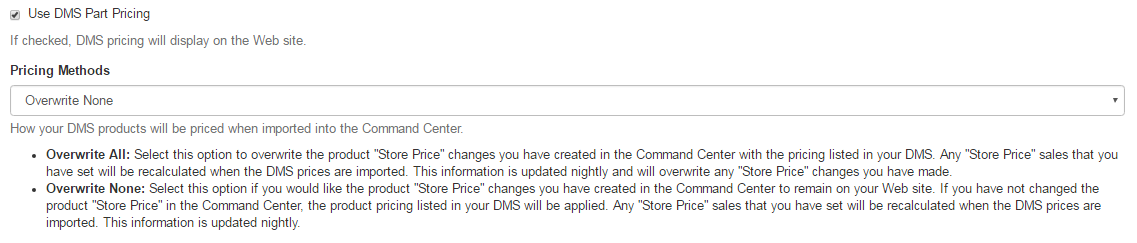
- Check the Use DMS Part Pricing checkbox if you wish to use the pricing you’ve set up in your Lightspeed system for your products. You will then choose a pricing method.
- Choose Overwrite All if you want your Lightspeed pricing to completely replace any other pricing you have set for products within the Command Center. Any “Store Price” sales that you have set will be recalculated when the DMS prices are imported.
- Choose Overwrite None if you wish to keep the pricing you have already set within the Command Center. An example would be if you set a store price of 10% off MSRP via Command Center, that price will remain the same and will not be overwritten by the DMS pricing. The products that have not been custom-priced within the Command Center will be updated with the pricing listed in the Lightspeed system. Any “Store Price” sales that you have set will be recalculated when the DMS prices are imported.
- Check the Display Inventory Quantities checkbox if you want inventory availability notifications to display on your website. This information is imported to the Command Center from Lightspeed during the nightly synchronization. When you select this option, additional configurations appear for you to set.
- Configure Limits: You can determine at what point inventory is low for a given item. The limits you enter here will dictate the type of notification that displays on your website (see Configure Messages section below).
- In Stock Low: You can set a value between zero and ten. If you set the number to five, then your website will display a message when you have five or fewer of those items in stock and available for immediate processing.
- At Warehouse Low: You can set a value between zero and ten. If you set the number to five, then your website will display a message when you have five or fewer of those items available to be ordered from your warehouse facilities.

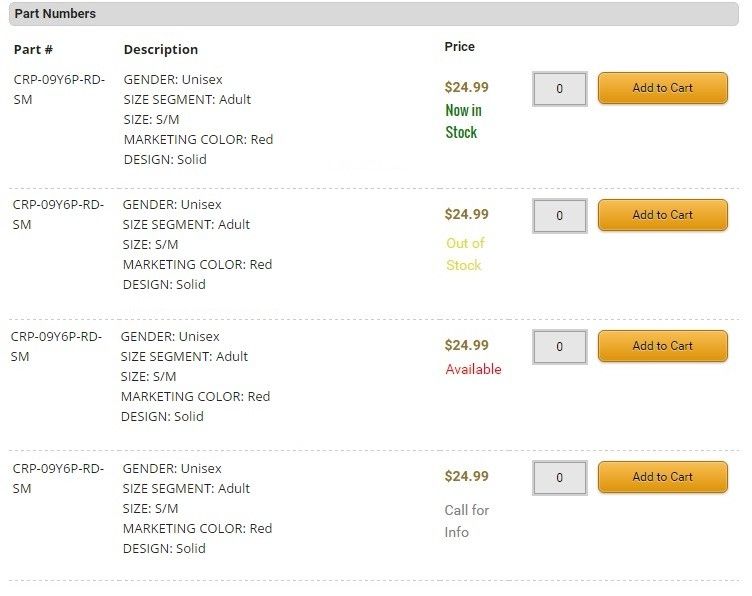
- Configure Messages: The Command Center can use your Lightspeed inventory information to tell customers whether your items are in stock or need to be ordered. The system will post a label and a tooltip ( a message that appears when customers hover over the label with their cursors) on your website when customers view your ecommerce items. You can change the text for these labels and tooltips based on the inventory limits you set in the Configure Limits step. Default messages are already set for each of the situations described below. The Label and the Tooltip for each message can be edited by typing over the existing messages in the entry fields.
- Now in Stock: This will display when the number of items you have on hand is higher than your In Stock Low value. This indicates that you have products on hand and are not in immediate danger of running out.
- In Stock Low/Warehouse Low: This will display when the number of items you have on hand and the number of items you can order are below your designated In Stock Low and At Warehouse Low values. You are not out of stock, but availability is limited.
- In Stock Low/Warehouse High: This label and tooltip will display when the number of items you have on hand is lower than your designated In Stock Low value, but there are plenty of products available to order from your warehouse.
- Warehouse Information Unavailable: This means that the number of items you have on hand is less than your In Stock Low value, and that warehouse inventory numbers are not available.

- Configure Limits: You can determine at what point inventory is low for a given item. The limits you enter here will dictate the type of notification that displays on your website (see Configure Messages section below).
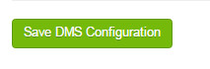
- When you are finished, click the Save DMS Configuration button at the bottom of the screen. Then click Publish Changes and Publish Keywords from the Website drop-down in the upper-right corner of the Command Center.
Here's an example of a product displaying each of the different inventory quantity messages.
Related Articles